I pitched my FMP to Gareth but came out feeling all the more confused and frustrated than when I started.
Perhaps it was when I pitched it; at the end of a long day when Gareth was particularly busy after an Open day event. Things just didn’t seem to connect during our discussion, examples were getting mixed up/combined together and both parties ended up getting confused. However, whether this was an issue on my end or my tutors, it is my responsibility as a designer who is pitching, that I do everything I can to get my idea across.
In future pitches, I need to be more succinct with my points and not go down rabbit holes. I put a lot of written information into my pitch blog, but when communicating said information it was all lost. I forgot to follow the basic rule of making a presentation; your audience will mainly be listening to you. The reading part comes secondary. As a result, I was not covering all the vital points and or ended up burying them under more and more ideas without giving my clear vision.
I believe I wouldn’t have had this issue if I practised my pitch out loud more, rather than just proofreading it and giving an off the cuff presentation.
Pitch Overview:
Below is an overview of my pitch blog that I tailored into a one-minute elevator pitch;
Initially, I planned on creating a three-dimensional three-panel comic that focuses on environment transitions and will be comprised of hand-painted assets. A style I want to teach myself throughout the project. I later changed my idea to be a vertical slice of an environment – a floating island – with scenes taking place on it and will change according to the interactive day and night cycle. Participants can change the time of day using a slider on the HUD. Depending on the time of day, a different scene will be taking place on the island.
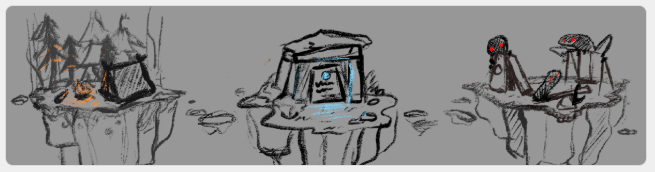
I have three ideas/environments that I could make atop the island. A camp, a playground and a temple.
The temple environment will have scenes showing the passage of time focusing on a deteriorating temple with a sprawling grassy field at the foot of its steps. Deer will graze on the grass in the morning, birds will perch on the crumbling ruins in the evening and at night an ominous glow will start emanating from the ruins as strange creatures begin walking out of the temple.
The camp environment will have scenes showing the progression of a boy scout arriving at a campsite in the morning, roasting marshmallows by the fire in the evening and sleeping in his tent at night when unbeknownst to him, a creature is watching him from the nearby woods.
The playground environment will have scenes showing the different people and creatures that use the playground throughout the day. A bunch of kids playing on it in the morning, a stray dog sniffing around in the evening while birds perch atop the swing set and finally strange ghost-like cryptids crawling out from beneath the apparatus at night to play on the park themselves.
I want to note that every environment is separate and not connected to the other. I will only be making one of the environments – campsite, playground or temple – for this project.
Below is a list of pros and cons for my three floating island environments:
Story 1 (Camp) – Pros & Cons
- Has a lot of textures that I’ll have to learn to paint; cloth, foliage, rocks, wood, fur, etc. However, considering I want to use this project to teach myself how to digitally paint, this is a good challenge and gives me a lot of opportunities to learn.
- Unoriginal – floating islands with forests on them are very common on Sketchfab and Artstation.
- Plenty of references/resources available both primary and secondary.
- Isn’t very sculpt heavy as the foliage is primarily made of planes.
- Has two humanoid characters – I won’t only be working on the environment but I can use these new techniques for character design as well.
Story 2 (Playground) – Pros & Cons
- Very animation heavy and will require animations made from scratch rather than sourced.
- Industrial with a minimal variety of textures; concrete, metal, rubber, etc.
- Lots of opportunity for character and creature design; children, animals and monsters.
- I haven’t seen artists both 3D and 2D make a floating island with a playground/park setting.
- Lots of references available both primary and secondary.
Story 3 (Temple) – Pros & Cons
- Simplistic, but good due to the tight schedule
- Lots of challenging textures; fur, feathers, foliage and stone.
- Animation heavy especially for the animals, which I’d have to make from scratch.
- Least interesting story out of the three
- Atmospheric and aesthetically pleasing. I feel this environment gives you the most freedom when it comes to colour palettes.
Feedback from Gareth:
My feedback from Gareth was very open-ended. It was verbal feedback and boiled down to “Do what you think is best. So long as you don’t mess up, you’ll be fine.” Which I both appreciate and hate because I’m terrible at making decisions. I am glad that he thought any of my ideas were good enough to get me a good grade though. However, it left me feeling all the more confused since each idea had an equal amount of pros and cons.
He did warn me about the number of assets, workshops and tasks that would need to be made/completed to achieve any of my ideas. He advised that I create a giant master post-esque To Do a list that has every single thing I need to do and make on there. Which I very much plan on doing in a future post.
Feedback from Kelly:
After reviewing my pitch with Gareth, tweaking it and practising my elevator pitch. I later pitched to Kelly who gave me written feedback via Facebook messenger. We continued to discuss my idea further there as well, which really helped me. I feel a lot more confident now and have a better idea of which story I will be doing for my FMP – The campsite floating island.
She suggested I include music on my island to create some ambience. I hadn’t thought of music, but it makes sense and would really bring the environment to that next level. I can gather foley sound in my back garden and if I can’t, there are a plethora of free downloadable soundbites online. I can program a specific audio clip to play during a certain scene using Unreal’s blueprint feature. I could probably connect the music to the button that switches between the three scenes. So everything will change simultaneously when a specific button is pressed.
Kelly also mentioned that I needed to build a little more story into the project to better string together each scene. As I mentioned above, I think I’ll have a recurring item throughout each scene aka the bag of marshmallows. In each scene from when the boy scout arrives, Bigfoot will be getting closer and closer before stealing the bag of marshmallows in the final scene.
Conclusion:
Overall, after reviewing the pros and cons and the feedback I got for my pitch and story ideas. I have decided to go with story two; the 3 part floating island story set at a campsite and featuring a little boy scout and Bigfoot. This idea has a lot of opportunities to learn different handpainted textures. It will also not only help broaden my skills as a concept artist but as a 3D modeller and texture artist too. It also touches on other jobs within the pipeline such as foley artist, VFX, lighting and rigging. It will be a lot of work and I have a lot of bases to cover, but I’m excited and rearing to go! It will be a learning experience no matter what.
FMP Plan:
This is a list of all the blogs I intend to make during the project, what programs I’ll be using and how I will document all of my progress;
- Primary & Secondary Evidence – Images of my trip to the forest, foliage and other asset references. I plan on setting up our old tent in the garden and doing some lighting tests at night to get some texture reference and to see how the fabric would react to different types of light. All secondary evidence will be collected online on google images or Pinterest. Finally, I will be documenting everything on WordPress as well as describing each photo and how it will be used to benefit the project.
- Contact Artists – I plan on contacting up to three artists and ask them for tips, tricks and advice on my project. I will record and analyse their responses in this blog. If I don’t get any responses, I will analyse the artist’s work to try and break it down and figure out their art process instead.
- Concept Art – Sketches, silhouettes, final designs, etc. I will be drawing everything in ProCreate and Clipstudio Paint on my Ipad. ProCreate has a recording feature, so I will record all my work as speedpaints and explain my process by recording audio over the top of the video. I plan on using online youtube tutorials as well as Udemy courses to help teach me how to paint digitally.
- Modelling Process – My modelling and sculpting process for each of the assets. I plan on primarily using Maya, but will also be downloading a trial version of Zbrush for the sculpting stages. I might make a separate blog comparing the differences between Mudbox and Zbrush to see which better suits my needs. All my process will be recorded via GeForce NVIDIA and I will either write about my process in detail underneath each video or record audio of me talking about the process. Any problems and solutions to said problems will be documented in this way also.
- Texturing – My texturing process which will include me drawing them in Procreate, editing them in photoshop and testing the on the model in Unreal will be documented the same way as my modelling process. Any problems, solutions and hypothetical solutions to unsolvable problems will be documented int he same way too.
- Rigging Workshop – A blog all about me testing all the different ways to create a basic rig for my characters. I will try up to two different methods, compare them and decide which suits my needs best. This will all be written down and shown through screenshots. Finally, I will include a video showing how I use my chosen rigging method to move and position my two characters.
- Foley sound – A record of all my primary and secondary sourced soundbites. This blog will include videos of how I edit and clean the audio clips (if I need to) in ‘Adobe Audition’ and how I implement them into Unreal. Everything will be documented via video with either written descriptions or video narration.
- UI Design and Coding – My process when designing and implementing my UI into Unreal. This blog will also show all of my blueprints and node layouts in screenshots. I will primarily be documenting everything on this blog via written step by steps and screenshots.
- Lighting & VFX – A blog documenting all the finishing touches such as lighting and VFX. Everything will be done in Unreal although I will be using Photoshop to create LUD filters.
- Artshow 2020 – Will have evidence of the Artshow, my set up and reviews from my peers. This will have links to the completed game, fully rendered models as well as a physical design board that I will print out and assemble. Finally, it will have the results I collect from my questionnaire/survey which I will give to my peers. I will not only record people trying out my game, but take pictures as well.
- Final FMP Overview – A written essay about my journey from point A to B. I will go over what I learned during this project, what I improved and what I wish I did more of. This will be a review of the project as a whole and what I personally think of it. Everything will be written.
Note: At the end of every blog above I will include a conclusion and evaluation based on how I found the task, how I could improve if I had to do it again and an overall reflection of the project thus far.
